How to Make a Temporary Gas Cap for Your Car (Use Only in an Emergency!)
Losing or breaking your gas cap while on the road—especially far from an auto parts store—can be a stressful situation. Without a proper seal, fuel vapors can escape, moisture and dirt can enter your tank, and your vehicle’s emissions system can detect a leak, triggering the Check Engine Light.
In some vehicles, especially modern ones with sensitive evaporative emission control systems (EVAP), even a loose or missing gas cap can cause drivability issues or prevent your car from passing emissions tests.
But don’t panic just yet! If you’re stranded and need to get to a store or mechanic, there’s a simple DIY emergency solution using everyday items that can help you limp your car to safety—temporarily.
Important Warnings & Safety Considerations
Before proceeding, please read these critical safety notes:
This is NOT a permanent fix:
- This method is strictly for short-term use only, intended to cover a few miles of driving at most.
- It is not safe, legal, or reliable for long-term use.
Fire Hazards:
- Gasoline vapors are highly flammable.
- Do not smoke, use open flames, or allow sparks near the fuel filler neck.
Ventilation:
- Work outdoors or in a well-ventilated area.
- Avoid inhaling gasoline fumes.
Static Electricity Precautions:
- Before touching anything near the fuel filler neck, ground yourself by touching unpainted metal on the car frame.
- Avoid wearing synthetic fabrics that can generate static electricity.
Metal Tool Caution:
- Do not allow any metal tool to touch both the inside of the filler neck and the car body simultaneously—this could create a spark.
Never Pump Gas with a Temporary Cap:
- Remove the temporary cap completely before refueling.
- Doing so while it’s installed could lead to spills, leaks, or dangerous pressure buildup.
Sealing Limitations:
- This method may reduce contamination and vapor loss but won’t fully seal the tank like a factory gas cap.
- It may not prevent EVAP codes, especially on newer vehicles with advanced diagnostics.
Check Engine Light May Stay On:
- Even with a good temporary seal, the light may remain until the vehicle completes multiple drive cycles or the code is manually cleared.
What You’ll Need (Common Household/Trunk Items)
You probably already have everything you need in your kitchen drawer or glove box:
| Item | Purpose |
|---|---|
| Plastic Wrap (Heavy-Duty Preferred) | Creates a flexible, non-sparking barrier over the filler neck. |
| Rubber Bands (Thick Ones Best) | Used to secure the plastic wrap tightly around the filler neck rim. |
| Clean Rag or Paper Towel | For wiping debris off the filler neck rim before sealing. |
| Scissors or Utility Knife (Optional) | To cut the plastic wrap to size. |
| Small Plastic Bag (Freezer Bag Ideal) | Alternative if no plastic wrap is available. |
| Aluminum Foil (Last Resort Only) | Use only if no plastic options are available; handle with care due to static risk. |
Step-by-Step Instructions
1. Park Safely and Prepare
- Pull over to a safe, level location.
- Turn off the engine and engage the parking brake.
- Open the fuel door carefully.
2. Clean the Filler Neck Rim
- Use a clean rag or paper towel to wipe away any dirt or debris from the outer edge of the filler neck opening.
- Do not insert anything into the filler neck itself.
3. Cut or Tear the Plastic Wrap
- Tear off a square or circular piece large enough to fully cover the filler neck with at least 2–3 inches of overhang all around.
- If using a plastic bag, cut it open to form a flat sheet and cut to size.
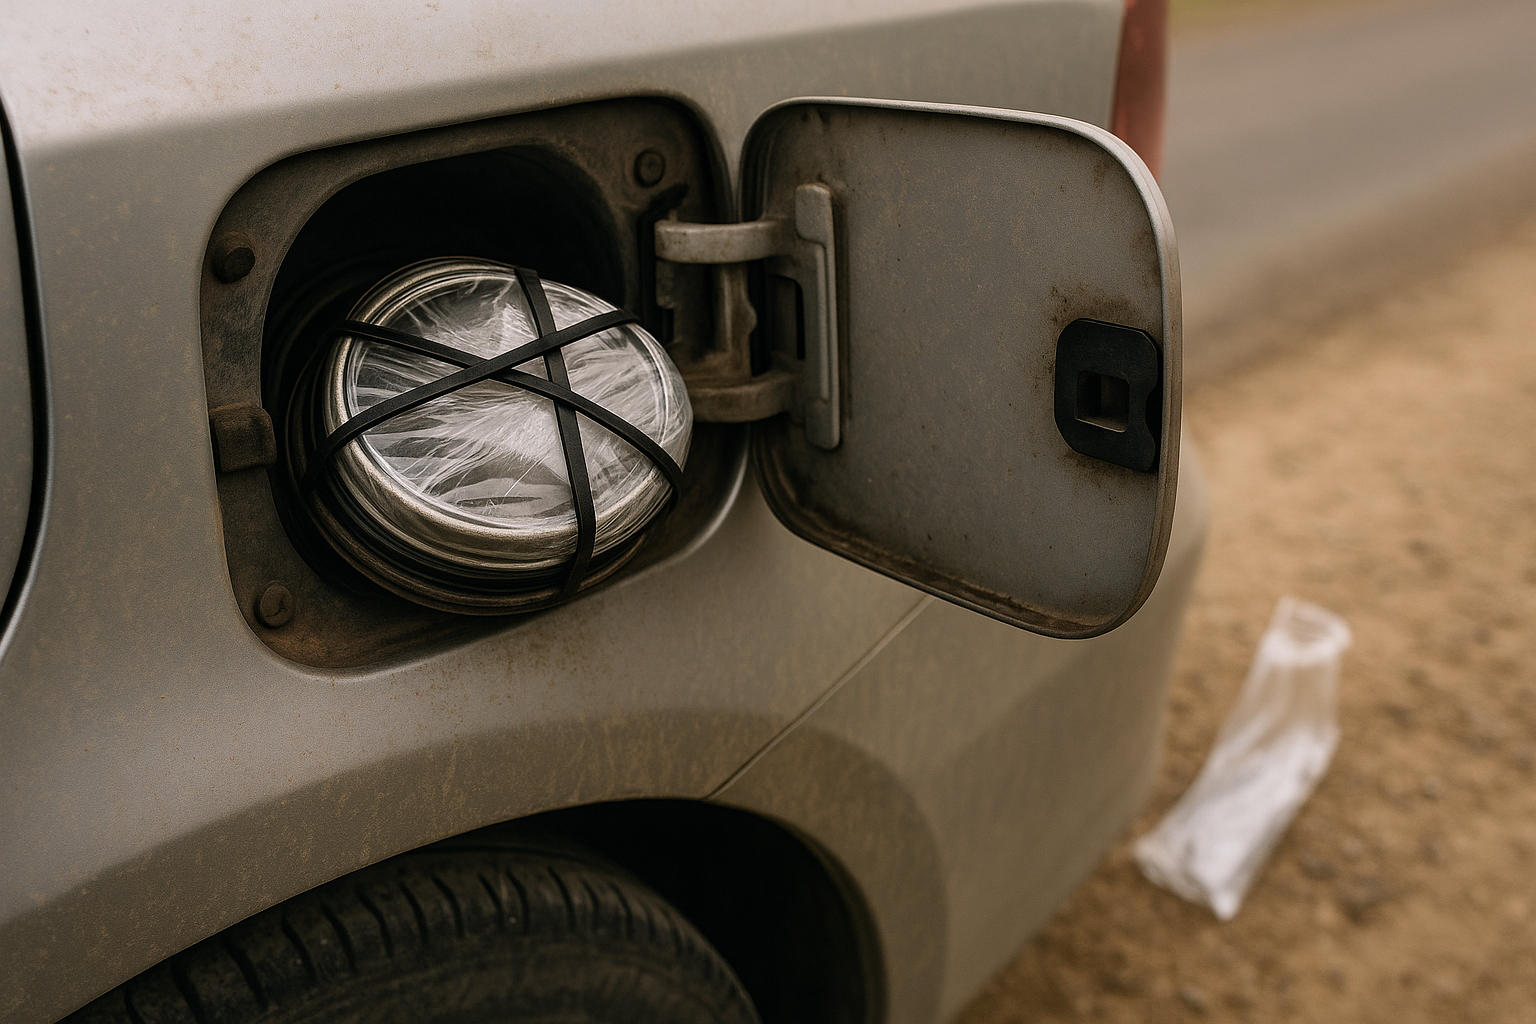
4. Apply the Plastic Seal
- Center the plastic over the filler neck opening.
- Gently press the center of the plastic down slightly into the opening to create a concave shape. This helps form tension and improves the seal.
- Smooth the plastic outward as evenly as possible, minimizing wrinkles but allowing for small folds.
5. Secure with Rubber Bands
- Start by stretching one thick rubber band diagonally across the plastic, hooking it onto the lip of the filler neck rim below the threads.
- Add a second rubber band in the opposite diagonal direction to form an “X”.
- Add a third rubber band horizontally and a fourth vertically if needed.
- Ensure the rubber bands are seated firmly below the threaded part of the filler neck to avoid interference when removing the cap later.
6. Double-Check and Trim Excess
- Press gently around the edges under the rubber bands to confirm the plastic is taut and sealed.
- Carefully trim any large flaps of excess plastic, but keep a margin around the rubber bands to avoid accidentally cutting through the seal.
Using Your Temporary Cap
Drive Directly to a Store or Mechanic
- Do not delay—get to an auto parts store, dealership, or repair shop as soon as possible.
- Avoid unnecessary stops or detours.
Drive Gently
- Maintain moderate speeds.
- Avoid aggressive acceleration or hard braking that might shake or loosen the temporary cap.
Monitor the Seal
- At every stop, quickly check that the plastic remains intact and the rubber bands haven’t slipped or broken.
Critical: Remove the Temporary Cap Before Refueling
Fueling Protocol:
- Before opening the fuel door or handling the pump, remove the entire temporary cap assembly—plastic and rubber bands.
- Discard the materials safely.
- Only then should you proceed to pump gas normally.
Install the Correct Replacement Cap
Once you’ve purchased the correct replacement gas cap for your vehicle:
- Screw it on tightly until it clicks 3–4 times to ensure a full seal.
- Some caps will continue clicking indefinitely, so follow your owner’s manual instructions if applicable.
Address the Check Engine Light
Even after installing the new cap:
- The Check Engine Light may remain illuminated for several days or drive cycles.
- In many cases, the vehicle’s computer will automatically reset the code once it confirms the EVAP system is sealed again.
- If the light doesn’t go out after a few days, you may need to have the code cleared using an OBD-II scanner (many auto parts stores offer this service for free).
Why Not Just Drive Without a Gas Cap?
Driving without a gas cap—even briefly—can cause several serious problems:
Contaminants Entering the Tank
- Dust, dirt, and water can enter the fuel tank and potentially clog filters or damage injectors.
Moisture Buildup
- Water in the fuel system can cause rust, corrosion, and poor engine performance.
Fuel Vapor Loss
- Gasoline vapors escaping into the atmosphere contribute to pollution and waste fuel.
EVAP System Damage
- A compromised seal can cause pressure imbalances in the EVAP system, possibly damaging components such as the purge valve or charcoal canister.
Check Engine Light Activation
- Most modern cars will immediately trigger a fault code and illuminate the Check Engine Light.
Legal Consequences
- In some states and countries, driving without a functioning gas cap is illegal and may result in fines or failed emissions inspections.
Conclusion
This temporary gas cap hack is a practical roadside solution born out of necessity. While it uses basic household items, it should never be considered a substitute for a proper gas cap.
The goal is to protect your fuel system just long enough to reach a place where you can purchase and install the correct replacement.
Always prioritize safety during construction and operation. Drive directly to a parts store, drive gently, and never attempt to refuel with the temporary cap still in place.
Getting the right gas cap installed promptly is crucial for your vehicle’s performance, fuel efficiency, and environmental compliance.